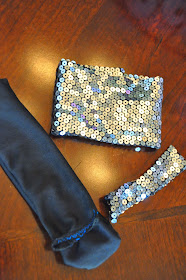
Spring cleaning was in full force at my house this past month. Josh and I had accumulated so many articles of clothing that our closet was bursting at the seams and we weren't even wearing HALF of the clothes in there. We knew it was time for our annual purge and over Memorial Day weekend we finally took the plunge. I decided that if it hadn't been worn it in a year it was time to donate. While cleaning I stumbled upon this little beauty and took a stroll down memory lane to a life pre-children, pre-mommy. I bought this dress as a Halloween costume back when my body was just a tad bit tighter and tried to pass myself off as a disco ball. What was I thinking?!
Well, I'm a typical woman; completely and utterly attracted to anything that glitters and couldn't bring myself to throw it out. Instead I decided to do a little up-cycling. I have been seeing these deliciously sparkly bow headbands everywhere these days and decided to give it a go for myself... Here are my step-by-step instructions for those of you who would like to try, too!
What you'll need:
- Pre-mommy sparkly dress (or any sequin material)
- Black jersey knit material
- Scissors
- Hot glue gun
- Sewing machine
- Sewing thread
- Rotary cutter (optional)
- Cutting mat (optional)
I took my dress and did a little surgery using fabric scissors. Turning it inside out I cut the sequin material from the black jersey material.
Next I cut the sequin material into a 10" x 7" rectangle.
Next you'll take the black jersey material and cut it 5" x "17 (or however long you're needing to fit) Callie is 2 years old and the material stretches quite a bit, this fit her perfectly.
I also cut a piece of sequin material 2" x 4" (not pictured) to act as the center of the bow. Next you'll take your pieces to the craft table to glue and sew...
Taking your large sequin rectangle, fold the bottom up to the center (right side down). Add a strip of hot glue to the edge and fold the top down to meet in the center.
Turn the material vertically (so it looks like an I) and repeat the last step; fold the bottom up to the middle, glue across and then fold the top down to meet it in the center. It will now look like this (the back of the bow).
Put this aside and grab the black jersey material. Using your sewing machine and a zig-zag stitch sew the right sides together straight down lengthwise.
Turn right side out.
And now sew the ends together. I used blue thread for a visual, but of course, you'll use matching thread.
Using the smaller sequin material, glue the long edges together right side down. You'll now have these three pieces :
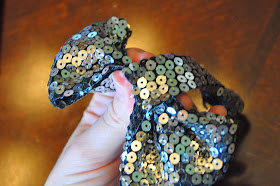
Turn the larger sequin piece right side down and pinch length wise in the middle so that when you turn it around it looks like this (are you starting to see the bow?):
Then using your glue gun and the smaller sequin piece, attach it to the middle of your bow (nice and tight!)
Now all you have to do is attach it to your black jersey headband. You can also use your choice of elastic if you so choose. I think it would look adorable on some black glitter elastic, too! You can either hot glue it to the headband or sew it on. I choose to sew mine just to make it a little more sturdy. Then put it on your little model and snap away!
And that's it! Pretty simple, right?! I LOVE that it was an up-cycle. There is still plenty of material left for other projects, too. My brain is just twitching at all of the possibilities... I hope you enjoyed this tutorial, feel free to comment with any questions as well! And don't forget to stop by and "LIKE" my Facebook and Etsy pages, too. Happy crafting! If you like it, please consider pinning it!


I love this! How do you actually sew the bow onto the headband? Do you just sew the bottom of the middle piece that you wrapped around or how does this work? I'm pretty to sewing. :) Thanks!
ReplyDeleteTWilson3 - thank you! I would suggest sewing it to the headband before placing the center around the middle of the bow... Another option would be to hand sew it once everything is finished. Hope this helps you! <3
ReplyDelete