http://www.bloglovin.com/frame?post=1229835027&group=0&frame_type=fb&blog=6154585&link=aHR0cDovL21vcmdhbnMyZGF5LmJsb2dzcG90LmNvbS8yMDEzLzA3L3N0cm9uZy1nb2QuaHRtbA&click=0&user=0https://www.facebook.com/CallieMarieCreationshttp://instagram.com/nickilynne15#http://www.pinterest.com/nickilynne767/
Showing posts with label headband. Show all posts

Tuesday, June 24

DIY Sequin Bow Headband

Spring cleaning was in full force at my house this past month.  Josh and I had accumulated so many articles of clothing that our closet was bursting at the seams and we weren't even wearing HALF of the clothes in there.  We knew it was time for our annual purge and over Memorial Day weekend we finally took the plunge.  I decided that if it hadn't been worn it in a year it was time to donate.  While cleaning I stumbled upon this little beauty and took a stroll down memory lane to a life pre-children, pre-mommy.  I bought this dress as a Halloween costume back when my body was just a tad bit tighter and tried to pass myself off as a disco ball.  What was I thinking?! 

Well, I'm a typical woman; completely and utterly attracted to anything that glitters and couldn't bring myself to throw it out.  Instead I decided to do a little up-cycling.  I have been seeing these deliciously sparkly bow headbands everywhere these days and decided to give it a go for myself... Here are my step-by-step instructions for those of you who would like to try, too!  

What you'll need:
- Pre-mommy sparkly dress (or any sequin material)
- Black jersey knit material
- Scissors
- Hot glue gun
- Sewing machine
- Sewing thread 
- Rotary cutter (optional)
- Cutting mat (optional)

I took my dress and did a little surgery using fabric scissors.  Turning it inside out I cut the sequin material from the black jersey material.  

Next I cut the sequin material into a 10" x 7" rectangle.
 
Next you'll take the black jersey material and cut it 5" x "17 (or however long you're needing to fit) Callie is 2 years old and the material stretches quite a bit, this fit her perfectly.  

I also cut a piece of sequin material 2" x 4" (not pictured) to act as the center of the bow.  Next you'll take your pieces to the craft table to glue and sew...

Taking your large sequin rectangle, fold the bottom up to the center (right side down).  Add a strip of hot glue to the edge and fold the top down to meet in the center. 


Turn the material vertically (so it looks like an I) and repeat the last step; fold the bottom up to the middle, glue across and then fold the top down to meet it in the center.  It will now look like this (the back of the bow).

Put this aside and grab the black jersey material.  Using your sewing machine and a zig-zag stitch sew the right sides together straight down lengthwise.  

Turn right side out. 
And now sew the ends together. I used blue thread for a visual, but of course, you'll use matching thread.


Using the smaller sequin material, glue the long edges together right side down.  You'll now have these three pieces :

Turn the larger sequin piece right side down and pinch length wise in the middle so that when you turn it around it looks like this (are you starting to see the bow?):


 Then using your glue gun and the smaller sequin piece, attach it to the middle of your bow (nice and tight!)


Now all you have to do is attach it to your black jersey headband.  You can also use your choice of elastic if you so choose.  I think it would look adorable on some black glitter elastic, too! You can either hot glue it to the headband or sew it on.  I choose to sew mine just to make it a little more sturdy.  Then put it on your little model and snap away!  


And that's it!  Pretty simple, right?!  I LOVE that it was an up-cycle.  There is still plenty of material left for other projects, too. My brain is just twitching at all of the possibilities... I hope you enjoyed this tutorial, feel free to comment with any questions as well!  And don't forget to stop by and "LIKE" my Facebook and Etsy pages, too.   Happy crafting! If you like it, please consider pinning it! 


 post signature

Monday, June 17

Callie Marie Creations - Finally Open!

A while back I wrote a post contemplating opening a shop on Etsy to sell the sweet little headbands that I've been making for Callie.  Typically I'll get an idea and it will just sit and ferment in my brain juices until I come up with an excuse not to do it.  Well, no more excuses!  I've officially opened up shop, and I'm incredibly nervous excited about it.

Coming up with a name wasn't very difficult.  These headbands wouldn't be a reality if it weren't for the inspiration I get from my darling girl, so why not name it justly?  As is with most brand new shops, I only have a few listings of some of my absolute favorites, but I can also take custom orders and requests via email.  I'm currently working on two custom orders for the Fourth of July and am very excited about how they're turning out (Pictures will be coming soon)!

Here are some of the current listings, modeled by none other than Callie Marie herself. :)  I'll have some new items up soon that will be modeled by my sweet little niece and another close friend's precious babe and I can't wait!! 


This is a very scary journey for me.  Putting yourself out there isn't always easy and sometimes comes with a lot of heartache and disappointment.  My prayer has been that if this is in God's will, that He will take it and use it for His glory.  If you so desire, please spread the word about Callie Marie Creations to your loved ones and friends, any help is a HUGE help and I appreciate each one of you greatly!  Thank you for all of your support, encouragement and prayers.  We are truly blessed to have friends and family like you!

Please take a minute and check out our shop by clicking here!

Thursday, June 13

DIY Top Knot Jersey Knit Headband


Okay, I had another request for a DIY tutorial so I figured I’d give it a go.  A friend of mine sent me a picture of some adorable headbands she saw online and asked if I could show her how to make them.  It just so happens that I’ve been secretly lusting over these beautiful little creations myself, but haven’t been able to find a tutorial anywhere and I’m way too cheap frugal to buy pre-made ones. 

I took a little trip to Hobby Lobby (where Callie decided she’d say “hi” to every single person we passed… at least once) and picked up some jersey knit material.  They were a little on the pricey side so I just got ¼ of a yard per color.  I was kinda disappointed in their selection; they really didn’t have much to choose from. 

Anyway, I spent an afternoon trying to figure it out and finally had some success.  This is just the way that I did it, and by no means am I a professional, so if you can find a way to do it better, go for it!

What you’ll need:

·      Jersey Knit material (or an old t-shirt that you want to upcycle)
·      Sewing machine
·      Thread
·      Paper
·      Straight pins
·      Scissors

-->
Step 1:  You’ll want to cut the material.  I played with a lot of different lengths but found that (for my 12 month old) 22” X 5” worked the best. 

-->
Step 2: After your material is cut, fold it in half (like a hotdog).  Be careful because this material likes to roll up on itself. 


-->
Step 3: Take your piece of paper and using a round object from your house (I used one of Callie’s stacking cups) trace a semicircle onto the paper and cut it out.  This will be your guide for the ends of the fabric.  If you want a more pointed look, you can free hand that as well.  I like the rounded look for these headbands myself. 

-->
Step 4: Using your paper guide, cut out the shape on both ends of your fabric.

-->
Step 5: Pin your fabric in place.  This is totally optional; I skipped this part completely because I’m a little impatient…  Something I continually pray for. J 

Step 6: Sew the edges together.  I used a ¼ seam allowance but you can do whatever, just don’t get too close to the edge because this material tends to get sucked down into the sewing machine.  I also used a straight stitch instead of a zig-zag.   In the middle, skip over a little section of material (backstictch this or it will come apart when you turn it right-side-out).   If you skip this you won’t be able to turn the material right side out. 

-->
Step 7: Trim the edges

-->

Step 8: Turn the material right side out

Step 9: (Optional) You can hand stitch the little section that is left open if you so choose.  Because this material folds over onto itself, I just left the hole there; you really can’t see it when it’s on…


-->
Step 10: Tie a square knot with the ends. 


Now you’re finished!  I must say, I’m pretty pleased with the way these little beauties turned out.  They’re very stretchy and comfortable, Callie didn’t mind wearing it one bit.  Feel free to play around with the width, too.  The smaller the width the thinner the headband will be.  You can find my sailor knot headbands now on sale in my etsy shop! 

Happy crafting!!  


Tuesday, June 11

DIY Baby Leggings Tutorial


A lovely friend of ours is being blessed with her second pregnancy (praise the Lord for answered prayers!).  They have an incredibly adorable little boy already and, of course, were probably hoping for a little girl to dress up and love on.  Well, it turns out they are having another little boy... and a little girl!  That's right, twins.  We are absolutely overjoyed for this incredible, Godly family so when she asked me to help her out with some little girl DIY projects I didn't hesitate to say yes. 

This is a tutorial for how to make DIY baby leggins.  I promise you, this is SO easy, even a beginner could whip these things out in under 45 minutes.  Here's what you'll need:

  • Teen/Women's knee high socks (I found mine at Walmart, but they aren't always in stock.  If you know of a great online place please let me know in the comments section below.)
  • Scissors 
  • Sewing machine 
  • Thread
  • Straight pins


Seriously, that's all it takes!  Alright, hang with me as I attempt to break down the process.  :)

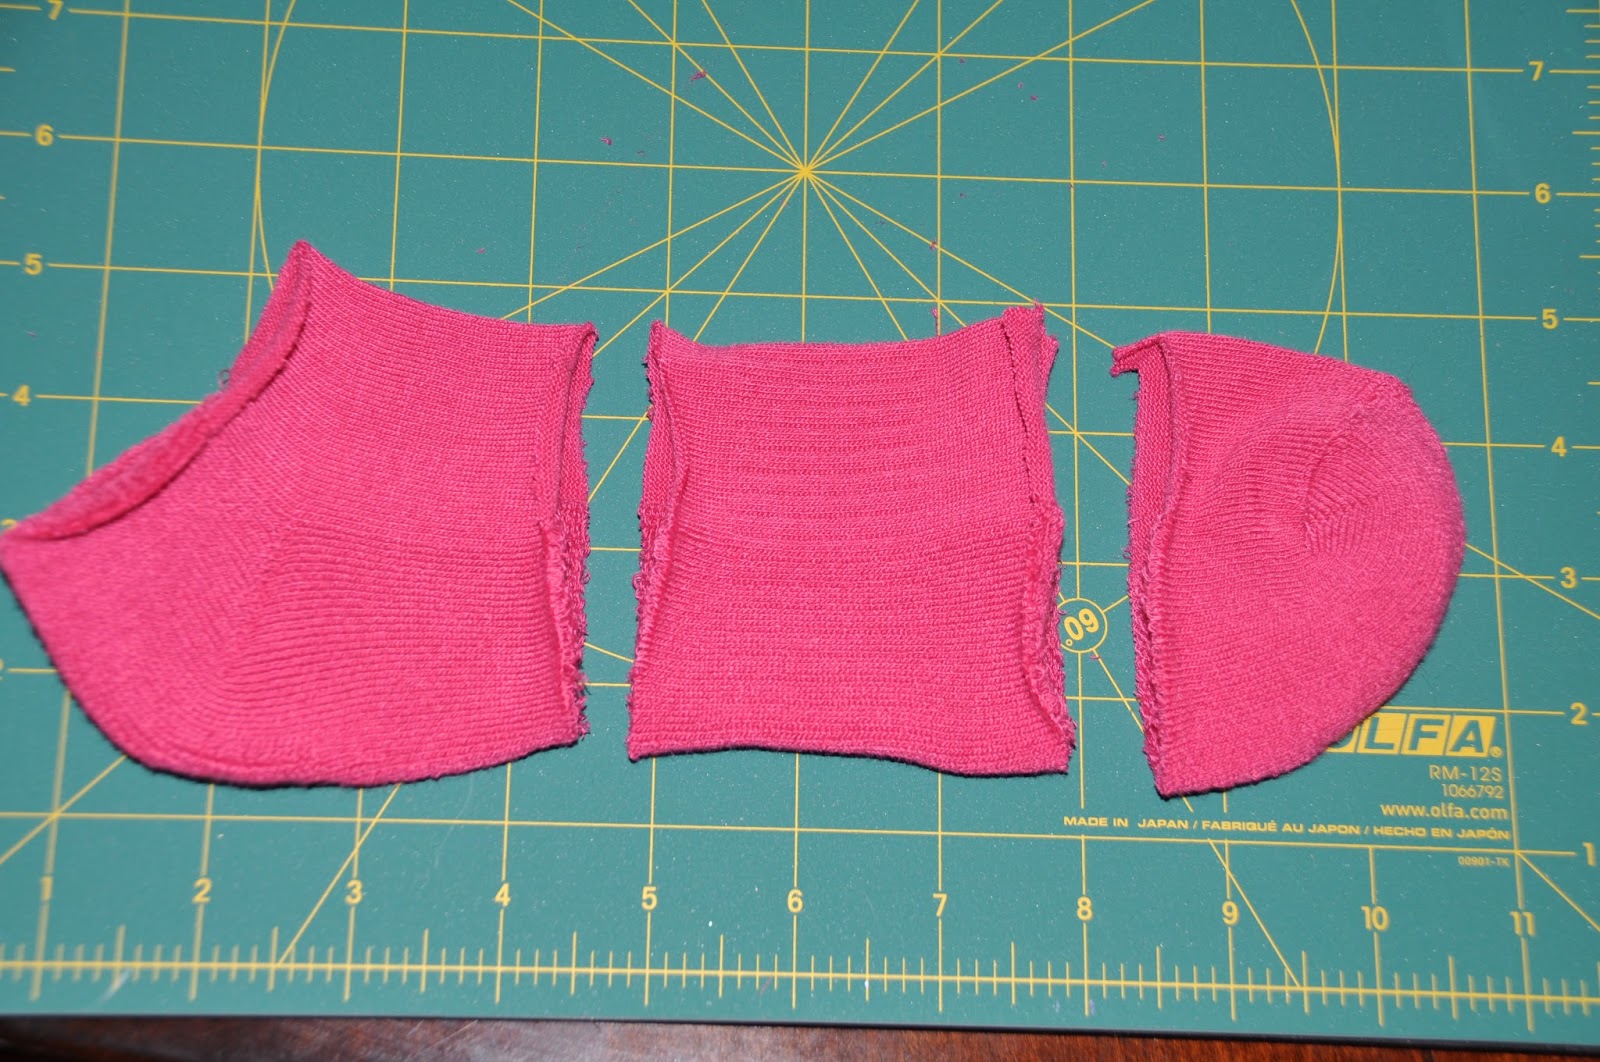
Step 1: Cut off the feet of both socks where the ankle would be.  Make sure that you do them exactly at the same point or you'll have one legging that is longer than the other.


Step 2: Cut out the middle section of the foot (mine were exactly 3 inches).  This is going to act as the hem at the base of the leggins.


Step 3: Fold the pieces you just cut out so that the insides are touching and both raw edges are together. The good side of the material should be showing.


Step 4:  Place the raw edges in line with the raw edge of the top of the sock.  This is where it gets kinda tricky.  Make sure that the upper portion of the sock is right side out and the small hem portion is also right side out.  I like to think of the hem portion as being a mouth that swallows up the tube of the upper portion... That probably just confused you more... If it did, sorry!


Step 5: Once the raw edges are all aligned (there should be 3 layers of material all along the edge of the sock opening) pin the material in place. I skipped this step once and never made that mistake again.  There are so many layers that it's difficult to make sure you're not leaving one out, if you do the leggins will have a gaping hole where the hem should be attached! 

Step 6: Sew!  I used a straight stitch.  Seriously it's so easy, just line the foot up with the edge of the fabric and sew around the entire opening once.  Make sure you're sewing around the edges and not through the entire sock from one side to the other or you'll end up with no opening.


Step 7: Trim the excess material.  If you skip this step your leggins will have a bulky look to them at the bottom, and being the perfectionist that I am, that just can't happen! 


Step 8: Pull the hem down and wa-lah!!!  You have a legging.  Repeat steps 1-8 for the second sock for a complete pair. 


Now, if you're anything like me, a hoarder crafty person, you'll be looking at the left over scraps thinking, I can't throw these away!  Surely there is something I can make out of them... And if that is your thought process then you're not alone! I took the excess scraps and turned them into a headband to match.  I was a little weary of using sock fabric (ie. it might fray) but they turned out really cute, don't you think?? 


{Here are the directions for a matching rosette headband.}

Step 1: Cut the toe portion of the sock scraps around in a circle using the edge as a guide. 


Step 2. Tie a knot at the tip of the fabric.


Step 3. Using the knot as a starting point, twist the fabric around and around the center.  You can use fabric glue to keep the material from slipping, but I'm impatient so, of course, I used hot glue!  (Warning, if you go the hot glue route, you will most certainly be playing hot potato with your fabric as the glue is, well, hot...)


Step 4: Keep going until all you have left is the last portion of material.  Take a little dab of glue to the bottom of the flower and secure the material over the entire base. 


Now you have a fabric flower!  Add some silk rosettes, beads and some elastic and there ya have it.  An absolutely adorable, waste-not, matchy-matchy headband!

I hope this wasn't too difficult to follow.  If you have any questions or comments please be sure to leave them below and I'll be sure to do my best to answer them. 


{Oh... And once you've finished, you'll of course have to do an impromptu photo sesh with your adorable 12 month old.  That might just be me though.  :) Happy crafting!!}